Add A Soundtraxx Decoder To An Atlas Dash 8-40B (5/2018 ver)
Jim Exler Nampa, ID March 16, 2024
Steps to Remove the Shell. (Atlas)
1. Take off the couplers first.
2. Next is the brake chain on the front right side. Do not remove the chain from the still or the brake cylinder. To remove the brake cylinder from the truck frame, use a small screw driver under the brake cylinder and lift upward slowly. It is mounted with a small post pressed into the sideframe. Just let the brake cylinder and the chain hang down from the still and be careful of the hook on the still as it will break easily.
3. Next, remove the fuel tank. The fuel tank is two halves and they pull apart right down the middle.
4. You might have to remove one air reservoir tank up front (nearest the cab). The middle tabs are under there though sometimes you can push the tabs inward without removing the air reservoir . There are tabs on the body, a total of six--two in the front (one tab on each side), middle and rear. They have to go inward, away from the frame tabs. Grab the bottom of the engine with one hand and with the other hand grab the shell near the radiator below it, in the rear, and using your pointer finger on one side and your thumb on the other, push inward so the tabs so they will clear the frame tabs. Repeat for the middle and the front tabs. If this does not work, turn the engine upside down and locate the tabs. Use a small screw driver to push the tabs (just a little) inward away from the frame, but don't let the screw driver go too far up you will damage the shell. Do this to all six tabs so they are clear of the frame tabs.
 |
Look closely at the chain and brake cylinder sitting on the cab and you will see the mounting post projecting downward. This view shows the shell and you can see the 6 molded retaining clips (gold) near the center and each end. Viewed from the bottom of the chasis, you can see the clips in recesses of the chassis where you will need to use a small screwdriver to release them. The shell is a tight fit. |
 |
|
Here are two pictures of the model with the shell removed. The upper has the 21 pin shorting board in place for DC operation and shows the speaker box to the left supporting the rear light. You can see the hole in the front sideframe where the brake cylinder was removed. I found that using the point of a drill bit by hand that is larger than the hole to put a small bevel on the hole made installing the brake cylinder much easier. The lower view is the left side with the fuel tank removed and the Soundtraxx TSU-21PNEM8 decoder that will replace the shorting board. |
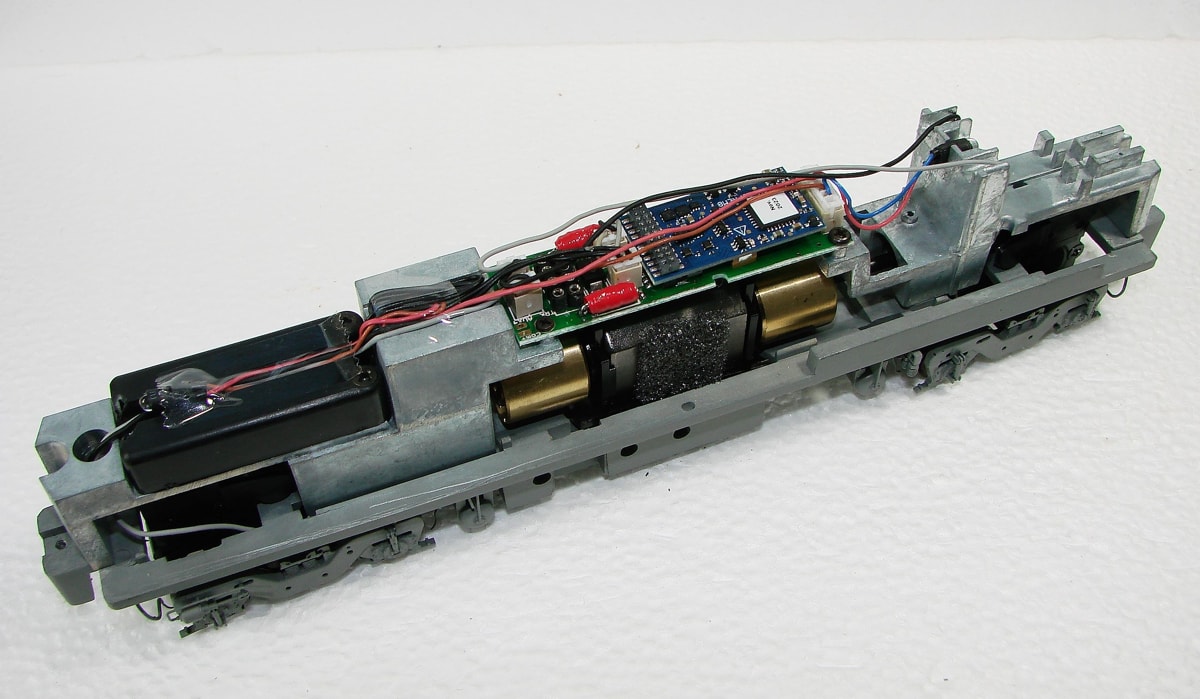 |
| This view shows the Soundtraxx decoder installed. |
|
|
Here are two pictures of the model ready to go on the layout. The brake cylinder has been reinstalled on the front truck sideframe with its chain. All that is left to do is adjust your favorite CV settings and enjoy. |